Page 2 of 8
Re: Experimental budget fursuit project
Posted: Mon Oct 20, 2014 10:20 pm
by Leeward
It's resting a bit crooked because it's floppy but yes it is still a little asymmetrical when worn. I'll correct that as much as possible in the foam but I'm not too worried about it because one can always "cheat" with the fur by trimming it to look symmetrical. I'm more worried about it actually looking like a cow.
Re: Experimental budget fursuit project
Posted: Mon Oct 20, 2014 10:33 pm
by Sev
I looks like a cow-dog hybrid.
Re: Experimental budget fursuit project
Posted: Mon Oct 20, 2014 11:57 pm
by Leeward
Hmm... I think I know how to fix that. It needs more filling on the sides between the cheeks and the mouth so that it looks less like a muzzle and more like a long face. The mouth and nose also need a bit of fixing, and the poll could be thicker. I'll do all that and other stuff (elastics and support structure for the moving jaw, velcro strap at the back) the next time I get a chance to work on it. Oh and it turned out the electric knife didn't pack up or overheat, the switch is just faulty.
Re: Experimental budget fursuit project
Posted: Fri Oct 24, 2014 1:46 pm
by Leeward
I fixed (or at least I think I fixed) the shape of the head. Feedback?
Re: Experimental budget fursuit project
Posted: Fri Oct 24, 2014 3:46 pm
by Leeward
I doodled on top of it to see what it might look like once finished.
Re: Experimental budget fursuit project
Posted: Mon Oct 27, 2014 11:45 am
by Leeward
Another doodle made from a photo of the head. Looks like crap but gives a good idea of what it will look like once complete. I changed the shape slightly since, the cheekbones aren't as big.
Re: Experimental budget fursuit project
Posted: Mon Oct 27, 2014 12:08 pm
by Dredge
That's a nice improvement, yes

Looking great, can't wait to see the final product with those lovely green eyes

Also, be sure to upload that art to your DA/FA pages, use it as a profile pic or something

Re: Experimental budget fursuit project
Posted: Mon Oct 27, 2014 3:29 pm
by Leeward
Thanks, I'm actually working on the eyes right now. I'm going for a realistic 3-D follow-me style, and I'm making them so they can be seen through. I also acquired the elastic belting I'm going to use for the jaw today.
Dredge wrote:Also, be sure to upload that art to your DA/FA pages, use it as a profile pic or something
I'd rather take a picture of the finished product. I don't like that pic, it's just a rough preview.
Re: Experimental budget fursuit project
Posted: Tue Oct 28, 2014 8:18 pm
by YoteFox
Haha I'm sorry to point this out but the blue foam and the semi ref you drew looked like a blou bul to me
Oh and also it's coming along greatly! Looks superb so far can't wait to see the end result
Re: Experimental budget fursuit project
Posted: Tue Oct 28, 2014 8:55 pm
by Leeward
Lol thanks a lot Yote!

You're right it does sort of look like a blou bul, but I think the colour balance is a bit off because the foam is actually more like a bluish green. Hopefully it'll end up a bruin koei met rooi hare en groen oë... if I don't suddenly go colour-blind when I buy the fur, although that shouldn't be a problem for the white forearms and feet.

Oh and I picked up all the little bits of foam I cut off while shaping the head, I'll re-purpose it as stuffing for the tail.
Re: Experimental budget fursuit project
Posted: Wed Oct 29, 2014 5:22 pm
by YoteFox
Dreamwalker Leeward wrote:
Oh and I picked up all the little bits of foam I cut off while shaping the head, I'll re-purpose it as stuffing for the tail.
I had the same idea when stuffing the tail and I came to the conclusion that the foam bits might make it a bit rugged and you will jeopardize the shape to some extent, teddy bear or pillow stuffing works great and is rather cheap, you can get a huge bag from a material shop for R15 or so, I stuffed two large tails with one bag and they are very well stuffed.
I still have all the foam bits I cut off of mine as well and I stuffed them into a plastic bag to test it and the bag was quite rugged
Re: Experimental budget fursuit project
Posted: Wed Oct 29, 2014 5:37 pm
by Leeward
I'm not too worried about this tail being particularly well-shaped, because it's going to hang loose and floppy. I can always chop the bits of foam into even smaller pieces to make the stuffing less lumpy.
Re: Experimental budget fursuit project
Posted: Sat Nov 01, 2014 10:29 pm
by Leeward
Progress! I articulated the jaw with two elastic belting straps, it now moves as my own. On the pics I am holding the back together because I haven't put on a fastening mechanism yet. Also you can't see my eyes because the low angle is outside my field of vision. I might change that, it makes it super hard to take selfies.
The nose I am going to coat/reshape with plaster or clay (haven't decided yet), paint, and then coat with clear varnish so that it's glossy to create an illusion of it being wet.
After that I still need to make lower teeth (cows don't have upper incisors but a hard dental pad), colour the inside of the mouth, make a tongue, redo the ears in craft foam, finish the eyes, connect and thicken the poll, and make the horns... then I can finally start furring it!
Yay, excitement!

Re: Experimental budget fursuit project
Posted: Sat Nov 01, 2014 10:52 pm
by Sev
Are you really planning on making the cow a ginger?
Re: Experimental budget fursuit project
Posted: Sat Nov 01, 2014 11:47 pm
by Leeward
More like russet, a light reddish brown kind of like
this. But yeah the hair will have either streaks or tips that fade towards a more saturated red. I like redheads, sue me.
Re: Experimental budget fursuit project
Posted: Sat Nov 01, 2014 11:58 pm
by Sev
If I recall, I already did that to someone in the Ban the Fur Above You game.
Re: Experimental budget fursuit project
Posted: Sun Nov 02, 2014 12:12 am
by Leeward
You can't sue someone over their colour-coordination... especially when that someone has perfect colour vision.
Actually I've been told that I have no fashion sense when it comes to matching different-coloured items, so maybe I should try a streak that I can take out before doing any dyeing of tips. But that's for after the furring has been done so I'll cross that bridge when I get there.
Re: Experimental budget fursuit project
Posted: Tue Nov 04, 2014 4:25 pm
by Leeward
I re-did the ears in craft foam, made a felt tongue and finished the eyes. Looks a lot more complete and alive now. The eyes are 3-D, follow-me, and see-through. You can't see the 3-D with the flash though, and my phone camera can't autofocus for sh*t without it.
Re: Experimental budget fursuit project
Posted: Tue Nov 04, 2014 5:14 pm
by Sev
I won't lie, Lee, that thing is extremely unsettling. It wants to murder me in my sleep.

Re: Experimental budget fursuit project
Posted: Tue Nov 04, 2014 5:46 pm
by Leeward
It'll be less creepy once it has a facial expression and flesh between the lower eyelids and face. The low angle also makes it look creepier than it actually is.

I was quite proud of myself for managing to make fairly realistic eyes out of a 2L clear plastic bottle and old pair of stockings.
Re: Experimental budget fursuit project
Posted: Thu Nov 06, 2014 4:09 pm
by Leeward
I made the teeth and nose today. I'm only posting the teeth though because the nose has things stuffed into it to keep its shape while it dries.
This is home-made plaster, which can can be either oven-cast or air-dried, but needs lacquer to preserve (otherwise it absorbs moisture and crumbles). The recipe is below if anyone is interested:
Home-made plaster
1 part salt
1 part water
2 parts flour (not self-raising)
Dash of oil
Few drops of food colouring (optional, I generally don't use any)
Dissolve salt in water as far as possible, add food colouring (if desired), then oil, then flour. Mix well until firm and moist (surface should be fairly sticky). If it crumbles easily, add water; if it loses its shape easily, add flour. Best results obtained when combined in a food processor.
Parts can be stuck together by dabbing with water. When finished shaping, either leave to air-dry or leave in a warm oven (~50°C) until solid. Natural colour and texture is similar to ivory. Can be painted with acrylic paint once dry. Do not use watercolour unless you are willing to dry the piece again, since it moistens the plaster. Apply one or two coats of lacquer on all exposed surfaces (including the base) once finished colouring.
Unused mixture can be preserved for a few days refrigerated in plastic wrap or an airtight container. This mixture is edible and therefore suitable for children.
Re: Experimental budget fursuit project
Posted: Thu Nov 06, 2014 4:51 pm
by Sev
Very cool; that turned out very nicely.
Re: Experimental budget fursuit project
Posted: Thu Nov 06, 2014 5:30 pm
by Leeward
Thanks... *makes an about-turn* Ye gods! A positive comment from Sev! I thought the day would never come.
Just teasing you.
Re: Experimental budget fursuit project
Posted: Thu Nov 06, 2014 6:18 pm
by Leeward
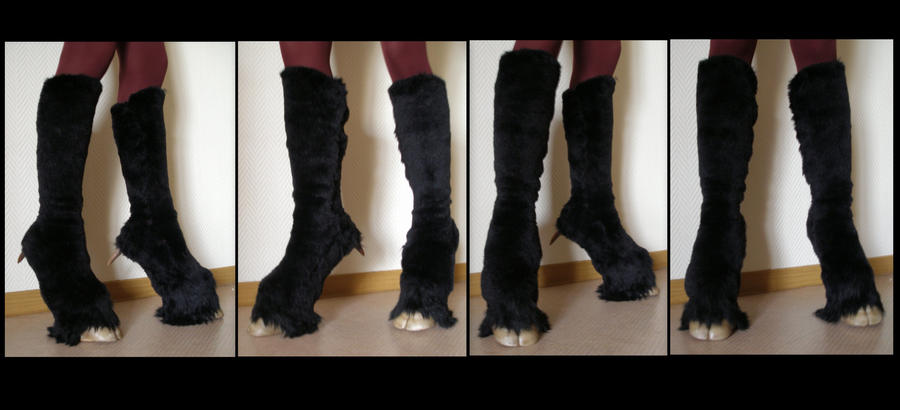
Just a thought... I'm considering making two versions of the feet for this costume: one that uses the stilts, and one like
hoof-boots. Both would connect to the upper leg at the knee with a hidden zip, so they would be interchangeable. My logic is that the stilts version would be for show on shorter outings, and the boots version would be more practical and comfortable for longer outings.
Opinions?
Re: Experimental budget fursuit project
Posted: Thu Nov 06, 2014 6:52 pm
by Sev
Versatility is always nice. Do not make the same mistake that I made: wearing extremely uncomfortable combat boots for the sake of authenticity. Comfort trumps all.
Re: Experimental budget fursuit project
Posted: Sat Nov 15, 2014 6:08 pm
by Leeward
Teeth and mouth are done! Here are the dentures:
What it looks like altogether with the tongue and placeholder lip:
And what it looks like from the front:
I'll add some selfies in my next post, stay tuned!
Re: Experimental budget fursuit project
Posted: Sat Nov 15, 2014 6:26 pm
by Leeward
Selfies! (These were really difficult to take with a limited field of view...)
From the side, mouth closed:
From the side, mouth open:
From the front, mouth partly open:
Re: Experimental budget fursuit project
Posted: Sun Nov 16, 2014 11:07 pm
by Helios_phi
^_^ Looking awesome
Re: Experimental budget fursuit project
Posted: Sun Nov 16, 2014 11:12 pm
by Sev
It's ALIVE!
Re: Experimental budget fursuit project
Posted: Mon Nov 17, 2014 10:43 am
by Leeward
Thanks!
I just need to paint and varnish the nose and make the horns and it's ready for furring!
Now to acquire the fur...